Posted: April 9, 2018
A story map is a simple way to share information about a place, embedding images, videos, and/or data into a customized map to share with other people.

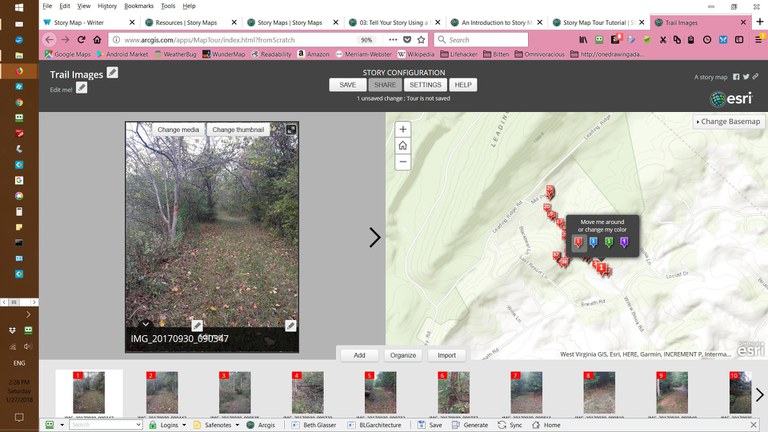
Making a story map is a fun way to share your forest with others. You can start a map using the Tour Builder in ArcGIS and importing your images, as shown.
Story maps are a great way to share your forest with others, by offering a virtual tour or showing its evolution over time. You can also call out specific features that are of interest, or track specimen trees or other special features. The Story Map templates for a tour or shortlist are great starting points for this type of a map. You can view examples of what each template looks like and how it has been used on the Story Map website.
I made a simple story map to show images along the two trails on our property that we opened to the public for the 2017 Walk in Penn's Woods. You can view it.
To start your map, you need to identify the area you want to include, and collect the images or other data for that area. Since we are using a geographic information system, the images should be geo-tagged to locate them on the map. Such images can be captured easily with a smart phone or a GISenabled camera. (If you don't have access to those, you can locate each image on your map manually.) Once you have all of the images, create a file and upload them to Flickr so they can be stored for access from the map. (People who have paid ArcGIS accounts can upload their images to the service directly, but the rest of us need to use Flickr to store the images.) If you keep images on a web server that can be accessed publicly, that can also be used.
To begin making your map, you'll need to set up a free account on ArcGIS. If you are fortunate enough to have access to a full, paid ArcGIS account, there are more tools and options available to you. But for most of us, a free 'Public Account' is sufficient. Go to the website and either create a new account or sign in to an existing one.
Once signed in, the easiest way to start is to use the TourBuilder. This will prompt you to identify where your pictures or videos are stored and to enter your user ID for that site. Once the dialog box connects, the drop-down menu will show the folders you have on that site. Pick the one where the images are stored (they must be in their own folder, separate from other images). If you want to bring in a series of data points, the information should be saved in a CSV file format, and that can be uploaded through the same dialog box by selecting the gear icon for advanced settings. Once you hit 'Import', the images will come up on a thumbnail map, and all of the geo-tagged pictures will have already been located. Small numbered icons will indicate each one.
Click the pencil icon in the upper left to name your Map Tour. You can change the basemap using the small box in the top right corner of the map. If you want to reorder your images, the Organize button near the bottom of the screen manages all of your points.
Each image can have its own information, and you can choose what you want each one to show (GIS location, text, etc.). The large image on the left is where you can edit each picture, changing its label, adding a thumbnail, or providing other information.
The Settings tab at the top center allows you to customize the color, the header, and other features of your map.
When you are happy with your map, you save it, and then share it, which makes it public. After you share your Map Tour, click 'Open' in the Share dialog to start it. You can also copy the shortened URL provided so you can paste a link to your map into email, social media, or a blog.
If you want to make further changes after you publish the map, it can be accessed either by going to the My Stories section of the website, or the drop-down menu under the 'My Content' tab once you have signed into ArcGIS online. There is a button to 'Switch to Builder Mode' to start your edits.
This is a pretty succinct overview. There are a lot of tutorials for the different map templates and forums to ask questions if you run into problems. I learned the most about this by taking an online course from Coursera. (Interestingly enough, it was the first MOOC -- Massive Open Online Course -- offered by Penn State. I highly recommend it.)
Resources:
- Coursera.com: Maps and the Geospatial Revolution offered by Dr. Anthony C. Robinson, PSU Department of Geography
James C. Finley Center for Private Forests
Address
416 Forest Resources BuildingUniversity Park, PA 16802
- Email PrivateForests@psu.edu
- Office 814-863-0401
- Fax 814-865-6275
James C. Finley Center for Private Forests
Address
416 Forest Resources BuildingUniversity Park, PA 16802
- Email PrivateForests@psu.edu
- Office 814-863-0401
- Fax 814-865-6275

